
- Retrofit
- Posted
Retrofit: Top tips

As the en masse energy upgrading of Irish homes and other buildings takes-off on an unprecedented scale, there are real dangers that even conscientious clients, professionals and contractors will make decisions that fail to save energy and create unhealthy buildings. Pioneering green architect Joseph Litlle, draws from the research and experience of his architectural practice & Building Life Consultancy to offer advice that should be heeded before any energy upgrade.
Note
This list is incomplete and doesn’t deal with windows and floors, solar gain, orientation, airtightness and heating systems, amongst other subjects. It does however provide useful guidance on some key aspects of many domestic refurbishments where problems can occur. The author takes no responsibility for how this information is used. Specific site conditions or brief or specification issues might make this information less relevant or even irrelevant. The client’s architect should make the final call as they bear the responsibility for compliance with planning and building regulations.
Preparation
1) It stands to reason that insulating a wall should not affect its strength or longevity, nor should it result in a buildup of moisture (interstitial condensation) or mould. However the industry is currently gripped with a desire to insulate to the highest standard in terms of U-value at the lowest financial cost, as quickly as possible, with little thought of these issues. An appropriate, robust solution must take the original wall, the occupant’s health, the room’s function and even the building’s location into account.
2) A key thing to remember about most walls and roof buildups is that vapour movement into the fabric from the room should be minimised, but any vapour within the building fabric – and there will always be some – should be allowed to migrate through and dissipate. However in every case moisture ingress should be minimised. The ability for vapour to diffuse – generally in an outward direction – must always be greater than the moisture content present. Grading building materials of the external envelope so that, from inside to outside, they grade from least to most vapour permeable is good practice. This ap-proach is evident where external in-sulation systems are used on masonry or in timber frame systems where the sheathing board is on the room side, not cavity side, of the frame for example.
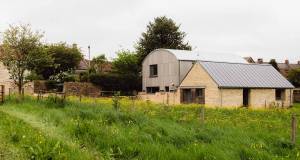
 |
| A house in Castleknock before and after upgrading by Joseph Little Architects |
3) Before attempting to apply internal or external wall insulation make sure all gutters, downpipes, gullies and sur-rounding ground are draining well. A problem with these will be com-pounded after insulating if not dealt with first.
4) As much as 70% of driving rain hitting an untreated surface is typically ab-sorbed by it: some short-term, some long-term. Cavity walls have the ad-vantage that the outer leaf deals with the driving rain, though humidity levels can be surprisingly high in the residual cavity – even to the extent of affecting internal insulation levels.1 Single leaf walls have to deal with humidity and moisture from within the room and humidity and driving rain from outside. Reducing the per-centage of rain ingress without reducing breathability – a term which refers to the ability of vapour to migrate through the fabric – is essential when any walls are to be internally insulated, but it is vital for single leaf walls. This happens automatically when external insulation is applied, but is needed as a separate treatment when internally insulating, especially on brick. In these cases a good silane or siloxane impregnation treatment should be used: the best penetrate deeply – to about 25mm – and leave no stain or discoloration. We have had discussions with Dry-Treat about their ‘Meta Crème’ product and would love to witness – alongside An Taisce and The Irish Georgian Society let’s say – a monitored test of this and equivalent impregnations on a historic brick building where in-sulation is required inside.
Internal insulation
5) Before applying the internal insulation make sure all paint is removed from the room-side of the original wall. This is very important to ensure that moisture can dissipate from this point after internal insulation is applied. Retain the original sand-cement or lime plaster on the inside face of the wall but remove any gypsum plaster – it’s generally pinkish but can come in different colours too. This is because the first two plasters reduce moisture ingress and are alkaline – thereby inhibiting mould – while the latter, when trapped within an insulated wall, can literally ‘go to mush’ and provide nutrients for mould.
6) A bathroom, kitchen, utility room or any ‘wet room’ where large amounts of moisture is produced, is particularly problematic for internal insulation as the room’s high humidity can sig-nificantly affect the amount of in-terstitial condensation within a wall. The three most important ways to deal with this are that (a) a good surface impregnation has been used on the outside of external single-leaf walls as described above, (b) a good humidity-triggered ventilation system is in use to reduce the moisture load as much as possible, primarily for the sake of occupants and (c) a continuous intelligent vapour control layer (VCL) is in place just behind the wall finish. The jury is still out as to whether the walls of the wet room should be tanked after steps a, b, c are taken. Fibreglass behind a floor-to-ceiling tile finish is becoming popular. Note non-hygroscopic finishes, like tiles, may make surfaces easier to clean but will exacerbate the peaks in room humidity levels.
7) To ensure that levels of interstitial condensation are kept in check after internal insulation is applied, don’t upgrade the wall to an insulation standard (U-value) better than 0.50 W/m2K. We’re aware this advice is contrary to the 0.27 W/m2K standard required in the Home Energy Saving scheme for internal insulation but we believe it is a more prudent position. It is based on awareness that high levels of insulation on the roomside of masonry walls isolate them from the heating system, causing them to cool to close to external conditions, leading to increasingly slow dissipation of vapour and moisture while the driving rain and internal moisture load continue unabated. The result can be continuous accumulation of moisture, and failure. Bear in mind 0.50 W/m2K probably represents a 66% reduction in energy loss on the original uninsulated wall. By insulating to this standard while installing a combination of other features – such as high levels of attic & floor insulation, good thermal bridging & airtightness, and the best boiler & heating controls – you should still achieve a high B-rating.

Shockingly bad mould growth in the en suite window of a recently built house in Meath
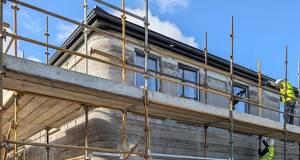
External insulation
8) If at all possible physically, financially and in terms of planning, use external wall insulation to upgrade walls. This approach can allow walls to be insulated to super-insulation levels of 0.15 W/m2K and beyond. It is important that the system is vapour permeable to allow the wall to breathe – though ‘sweating’ is a better analogy. Mineral wool, expanded polystyrene and woodfibre insulation with a proprietary mineral render finish work well in this regard.
9) Fringe benefits of external insulation, if well applied, are that it will reduce the incidence of thermal bridging, improve the dwelling’s airtightness, and has little impact inside, as the room sizes don’t change and décor can stay in place.
10) In this practice we consider it of prime importance that the windows be moved forward to the front face of the masonry substrate to reduce thermal bridging. Better still if they come just forward of the substrate and are bracketed back: this is usual in Central Europe. If existing windows are basic double-glazing it is far more sensible to spend money on insulating the walls for the first time rather than blowing the budget on upgrading the windows only. Remember ill-fitting or perished window seals can be changed for a few hundred euros.
11) The magic of an external wall insu-lation system is in its top coat of mesh and render. Our preference is for mineral as opposed to acrylic render finishes, as they can be applied in a wider range of weather conditions and repaired, if necessary, by any plasterer familiar with monocouche – one coat – renders in years to come. Acrylic and mineral renders can be given a wide range of surface treat-ments, including shadow gaps, pat-terns, colours and mouldings. There are also finishes designed to give the appearance of brick which could allow a brick building to be externally in-sulated while maintaining an appe-arance consistent with that of its neighbours. These finishes include brick slips (which are real bricks cast thin and carefully fixed on) and brick patterns in the render. There is con-siderable skill needed to apply either ‘brick’ finish realistically: check out previous examples of work of the team that tender to do it. Be fussy!
12) Whether this will be judged exem-pted development – in other words not requiring planning permission – or not depends on whether it’s listed, the type of brick bond, the age of the building, its architectural quality and so on. As an example a non-listed, detached house where stretcher bond brick was used on the ground floor only, should generally be a non-con-tentious case suitable for external insulation. The relevant quote from the statutes is contained in Section 4 (1) (h) of the Planning and Devel-opment Act 2000 which reads as follows:
“development consisting of the carrying out of works for the maintenance, improvement or other alteration of any structure… which do not materially affect the external appearance of the structure so as to render the appe-arance inconsistent with the character of the structure or of neighbouring structures”.
In our view this gives significant all-owance. In every case, however, one should consult an RIAI architect familiar with this kind of work.

The poorly designed mechanical extract in the en suite loops up from the ceiling into the eaves and comes out through the fascia, with inadequate ventilation leading to a mould-covered ceiling
Insulating the roof
13) It’s important to know the difference between a ‘cold’ and ‘warm’ roof, and between a breathable and non-breathable roof membrane. A cold roof has insulation on the flat ceiling, a warm roof has insulation on the pitch below or between the rafters. A breathable roof membrane allows vapour but not moisture through it – Tyvek and Solitex are well known brands – while a non-breathable membrane such as the traditional black bitumen-impregnated felt is vapour and moisture tight.
14) When insulating a cold roof make sure to take the insulation right to the perimeter to meet wall insulation, while ensuring existing ventilation paths are kept clear. This is essential to prevent moisture buildup in the loft and damage to timbers. In the case of perimeter ventilation this apparent conflict can be resolved by using loft vent trays. House B in the energy-efficiency upgrade section of the www.energyquarter.ie website shows an example of this.
15) When converting what was built as a cold roof into a warm roof – to create a loft room or vaulted ceiling – you must either strip off the tiles to replace the old non-breathable membrane with a breathable one, or create a very well-ventilated zone between the underside of the old membrane and the new insulation - a minimum of 50mm. Glidevale, Capco and Harcon have rafter ventilation products for ensuring ventilation paths at the ridge and eaves of existing roofs. Remember if only 50mm ven-tilation is provided then tile ventila-tors may not suit as they will only vent one bay.
16) Be aware that most Irish houses only have battens above the roof mem-brane – not battens and counter-battens. This means that you are reliant on the roof membrane sagging somewhat to allow free draining of any water that gets below the roof tiles. When the original bituminous mem-brane is retained and there’s at least 50mm ventilation zone below it may not be a problem, but it can become one when a breathable membrane is installed and insulation is then packed tight behind it. Therefore ideally battens and counter-battens should be installed in this last case.
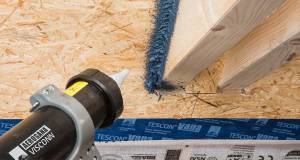
17) Below the new, pitched insulation layer you should install a continuous intelligent vapour control layer. Check out Ecological Building Systems’ Intello u membrane and airtightness tapes. This will provide an airtight assembly and will reduce the amount of vapour getting into the insulation zone but will also allow whatever is there to diffuse back into the room when conditions suit.
18) Lastly when insulating on the pitch specify a denser insulation for at least 30% of the buildup. Cellulose insu-lation is considerably denser than mineral fibre or petroleum-based insulants and woodfibre insulation is better again. This is because dense insulation has greater thermal inertia and so slows down heat transfer which can be very important in converted lofts, or rooms with cathedral ceilings, on very hot summer days and very cold winter nights.
 The walls of this Dublin brick building were re-pointed with cement mortars, which are more rigid and less flexible than lime based mortars. Hairline cracks between the mortar allow water in. When combined with frost-thaw cycles the brick-work is prone to crumbling; (right) the constituents of a Lunos humidity-sensitive demand controlled ventilation system due to be installed in Joseph Little’s hemp-lime studio")
(left) The walls of this Dublin brick building were re-pointed with cement mortars, which are more rigid and less flexible than lime based mortars. Hairline cracks between the mortar allow water in. When combined with frost-thaw cycles the brick-work is prone to crumbling; (right) the constituents of a Lunos humidity-sensitive demand controlled ventilation system due to be installed in Joseph Little’s hemp-lime studio
Ventilation
19) The minimum – and therefore ubiquitous – standard of ventilation for housing in Ireland includes traditional hole-in the-wall vents or permavents in windows, with extract via intermittent fans in the bathroom – often activated by a light switch with five minute run-over. They make a very poor ventilation system. Many people hate hole-in the-wall vents – which can give rise to noticeable drafts – and block them up. Most intermittent fans are either too weak, too dirt-clogged, too old or poorly-located to extract the levels of moisture required. We wonder if most of them met the extraction rates required in the first place anyway.
20) In general Irish people have little idea when sufficient humid or viti-ated air has been extracted or can sense objectively what good air quality is. Proof of this must surely be the number of people who tolerate mould in their bathrooms and en-suites, and in the alarming growth of Irish people with respiratory dis-orders. All must surely agree that the best ventilation systems reduce these issues while minimising heat loss and energy use.
21) The 2009 revision of TGD F – the building regulations guidance for ventilation – at last deals well with mechanical ventilation with heat re-covery (MVHR) but considers this the only alternative to so-called natural ventilation as described above. The Department of Environment considers accidental ventilation through cracks and flues – meaning infiltration – to be part of the ventilation ‘system’ of Irish houses. In the new guidance document they are therefore penalizing anyone who doesn’t intend to use an MVHR system but manages to make their new or retrofitted dwelling more airtight than 5m3/m2hr, by making them increase their background ventilation – the hated holes-in-the-wall – by a whopping 40%. In our view this is very poor guidance and will lead to 40% more wall or window vents being blocked!
22) Demand-controlled ventilation may be the answer to all these issues, at less than half the price of the installed cost of MVHR and less builder’s works. Demand-controlled ventilation means that the amount of air supplied and extracted depends on the conditions in that part of the dwelling at that moment. As people and their activities produce humidity, a system designed to modulate up and down based on humidity will naturally ventilate most where it’s needed and least where it’s not.
23) Aereco’s system, Passivent’s ‘iMEV’, and Energy Efficient’s ‘Lunos’ are the three demand-controlled me-chanical extract ventilation (DCMEV) systems in Ireland. The inlet vents they supply for walls or windows have devices to protect against gusting wind and prevent drafts. The first two have humidity triggered controls at the supply point and all three have humidity-triggered con-trols at the central extract point. Typically the only ducts are vertical, rising through the first floor from ground floor wet rooms to a quiet mechanical extract fan which works at constant pressure but variable speed of 5 to 12 Watts in the attic. In contrast we have found that MVHR can be much more invasive in retrofitting houses due to the greater number of ducts and the need to keep duct lengths short to ensure optimum performance.
24) The silver-lining to the current state of guidance for domestic ventilation is that architects can use the UK building regulations Part F to prove compliance of an energy-saving DCMEV installation, as MEV is well-described there and our own TGD F 2009 makes no mention of it at all. Beware however that the real energy savings may not be represented in the dwelling’s BER as the Deap soft-ware doesn’t allow for DCMEV.
Actions for homeowners
•Hire an RIAI architect who can prove they do their own U-value calculations, have a good understanding of energy-efficiency, thermal bridging, interstitial condensation control and different insulation strategies.
•Look at the energy-efficient upgrades on www.energyquarter.ie prepared by Joseph Little Architects.
Actions for architects
For architects, builders or technically-minded homeowners who want to get much deeper into these issues we suggest you could:
•Read Joseph Little’s five-part Breaking the Mould series of articles which ran in issues 6, 7, 8, 11 and 12, volume 4. They’re also archived at www.passivehouseplus.ie/back-issues
•Attend Cultivate’s green building course series – see www.cultivate.ie – or
•Attend the RIAI CPD course, Designing low-energy domestic refurbs – opti-mising long term value for your client. See www.riai.ie/cpd/events
1 See Table 1, BR 262
- Articles
- retrofit
- Retrofit: Top tips
- guide
- energy upgrade
- insulation
- Internal
- External
- Membrane
- Intelligent Vapour Control
- Ventilation
- Permavent
- Woodfibre
Related items
-
 Housing minister calls for faster retrofit to shield homes from energy shocks
 -
 Accessible Manchester retrofit delivers comfort and low bills
 -
 Peaky blinder
 -
 History repeating
 -
Retrofit redux: Catching up with A3
-
 New Ejot profile cuts thermal bridging losses by 25mm insulation equivalent
 -
-
 Derelict to dream home
 -
 Why airtightness, moisture and ventilation matter for passive house
 -
 Ireland’s first 3D printed homes insulated with clay foam
 -
-
 Dr. Barry Mc Carron appointed MD of KORE Retrofit